Hey there, crochet enthusiasts! Whether you’re a seasoned beginner or an advanced crocheter, today’s treat is for you. I’m sharing a free crochet halter top pattern that’s versatile enough to challenge and delight crocheters at various skill levels. Say hello to “Halter Hues,” your next go-to summer project!


Why This Free Crochet Halter Top Pattern is a Must-Try
“Halter Hues” is not just another crochet top pattern; it’s a creative journey. Designed to be customisable, this pattern allows you to measure as you go, ensuring a perfect fit. It’s got jusct the right mix of simplicity and complexity to keep everyone engaged, from seasoned beginners to advanced pros.
Skills You’ll Hone
This pattern offers a range of stitches and techniques that will expand your crochet repertoire, no matter your skill level. I’ll also guide you through yarn and colour selection and offer design variations to spark your creativity.
Supplies You’ll Need
- Crochet Hook (follow the size recommendation on your yarn label)
- Yarn Needle
- Measuring Tape
- Stitch Markers
- Scissors
- Your favourite yarn
Pattern Highlights
Different Edging Options to Add a Unique Touch to Your Top
When it comes to crafting your custom crochet top, it’s the finishing touches that can truly make it one-of-a-kind. We explore a variety of edging options that will help you infuse your unique style into your creation. Simply choose the one that resonates with your personal taste.
Explore Colour Variations
If you’re feeling adventurous, consider experimenting with different colour combinations to put your unique stamp on the project.
Abbreviations
- ch: chain
- sc: single crochet
- sl st: slip stitch
- yo: yarn over
My top tips for selecting the perfect yarn
- Choose Natural Fibres: I’m a big fan of plant-based yarns because they are incredibly breathable. Unlike acrylic yarns, which can make your skin feel hot, sweaty, or itchy, natural fibres like cotton and bamboo are gentle on the skin and perfect for warmer weather.
- Prioritise Cooling Yarns: Since you’re crafting a summer top, it’s essential to opt for cooling yarns. Once again, cotton and bamboo are fantastic choices. They’ll help you stay comfortable even on the hottest days. On the other hand, wool or alpaca, with their insulating properties, might not be the best fit for this project.
Instructions
Lovelies, we’re diving into the wonderful world of crochet with “Halter Hues.” Get ready to create a custom-fit crochet top that will have you feeling fabulous. Here’s how:
1. Measure and Chain:
- Begin by deciding where you want your halter top to start, typically just above the bust. (Refer to the image below for reference.)
- Using your measuring tape, measure around your body at the chosen starting point for the halter top, and mark down the measurement below.
- Also take the following measurements, as we’re going to use them later.
Measurements:
#1. Measure around your body at the desired starting point for your top. Subtract 3 inches/7.5cm to allow for negative ease (stretchy yarn)
#2. Measure around the largest part of your bust, subtract 3 inches approx to allow for negative ease, and divide this measurement by two.
#3. Measure from the starting point of your top to the fullest part of your bust.
#4. Measure around the smallest part of your waist, subtract 3 inches approx to allow for negative ease, and divide this measurement by two.
#5. Measure from the starting point of your top to your desired finishing point.

- Now, chain until you match measurement #1. If you stretch it out, it should fit snugly when you wrap your chain around your body. Feel free to make any necessary adjustments to the number of stitches, as it will vary depending on your yarn size, and amount of stretch.
2. Foundation Row
- Single crochet (sc) in the 2nd chain from the hook.
- Place a stitch marker.
- Continue to sc in each chain across.
3. Join and Start Rows
- Slip stitch (sl st) into the first stitch of your foundation row (where you initially placed the stitch marker). (See image below)
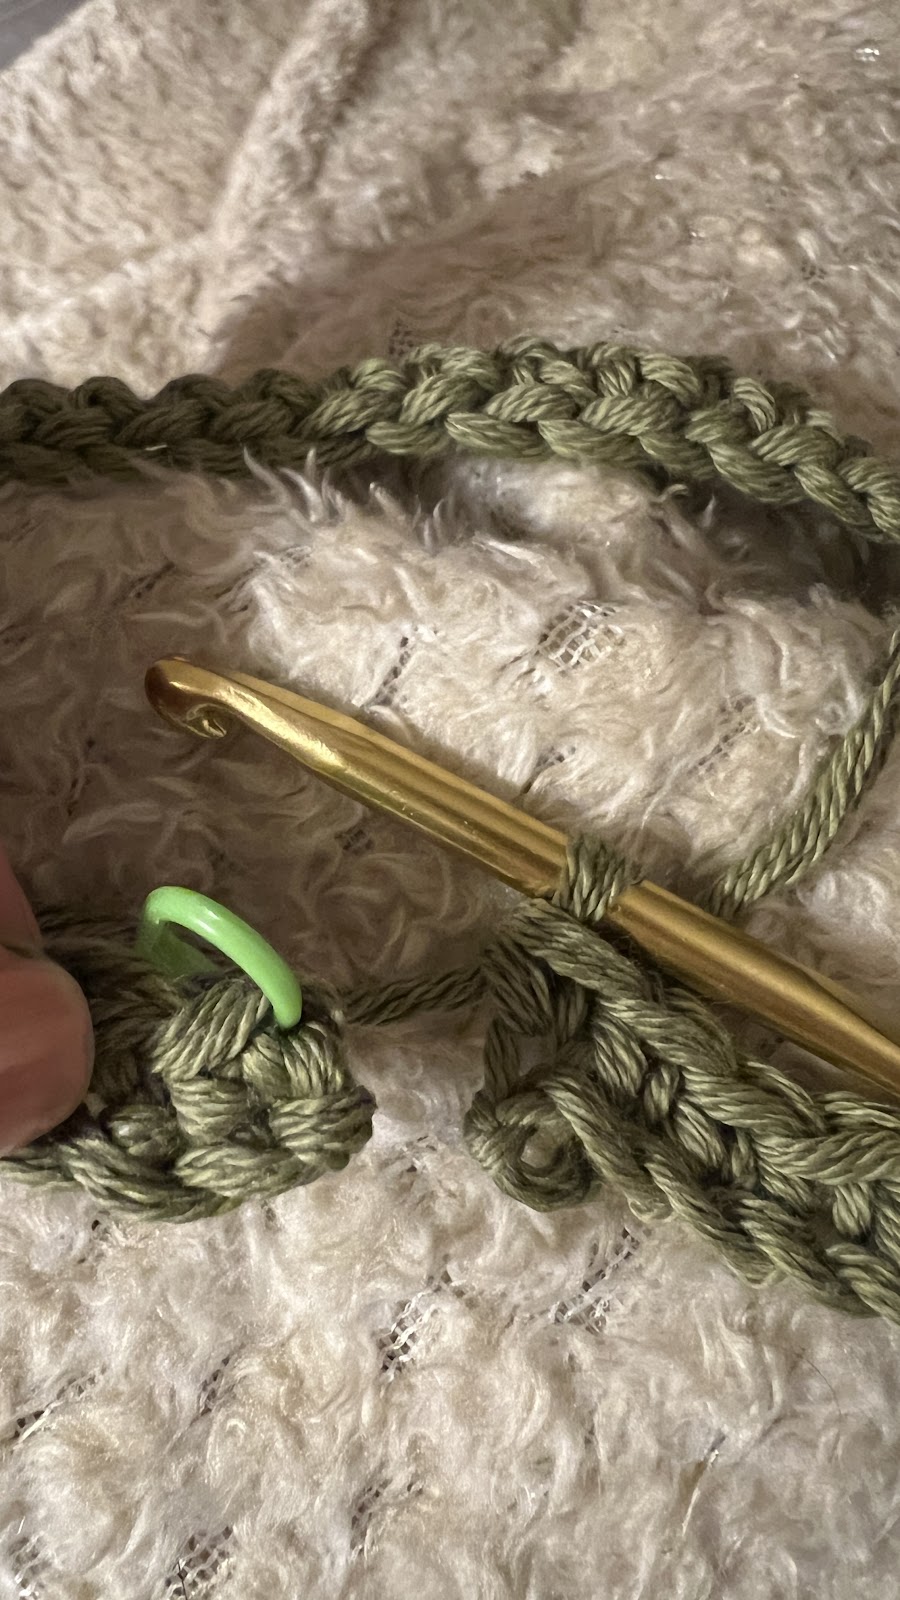
Note, that there will be a gap in the initial chain which we will fix up at the end. I do this, because it is too difficult to join the chain without twisting it, and much easier to join at this point. (see image below)
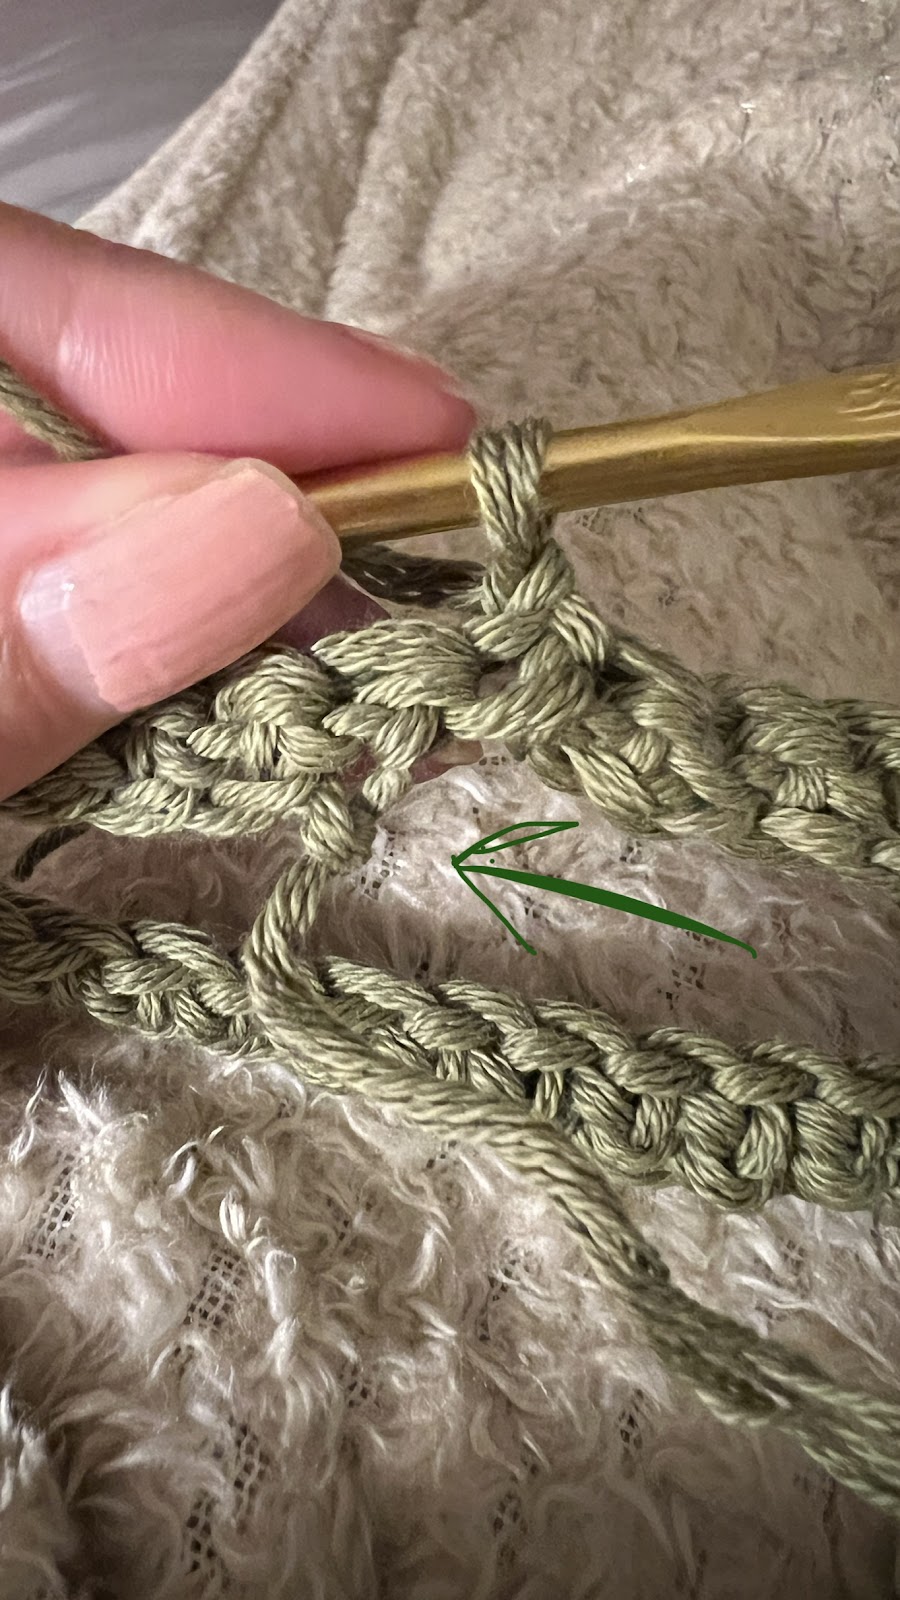
- *Chain 1, turn your work clockwise, and sc into the first stitch (being sure not to place the sc into the sl st you just made) Place a stitch marker.
- Sc in each chain across.
- To finish the row, sl st into the stitch of the previous row.*
Note: Be careful not to crochet into the slip stitch when nearing the end of the row to avoid adding extra stitches. Check out this super helpful post for guidance on How To Do a Seamless Single Crochet Seam
4. Continue
- Repeat step 3 from * to * until you’re ready to increase stitches to accommodate your bust size.
5. Adding Increases
- Generally, you’ll do this after the second or third row. Note: Some testers didn’t feel the need to increase for the bust as their yarn was stretchy. Feel free to only increase if you feel you need it.
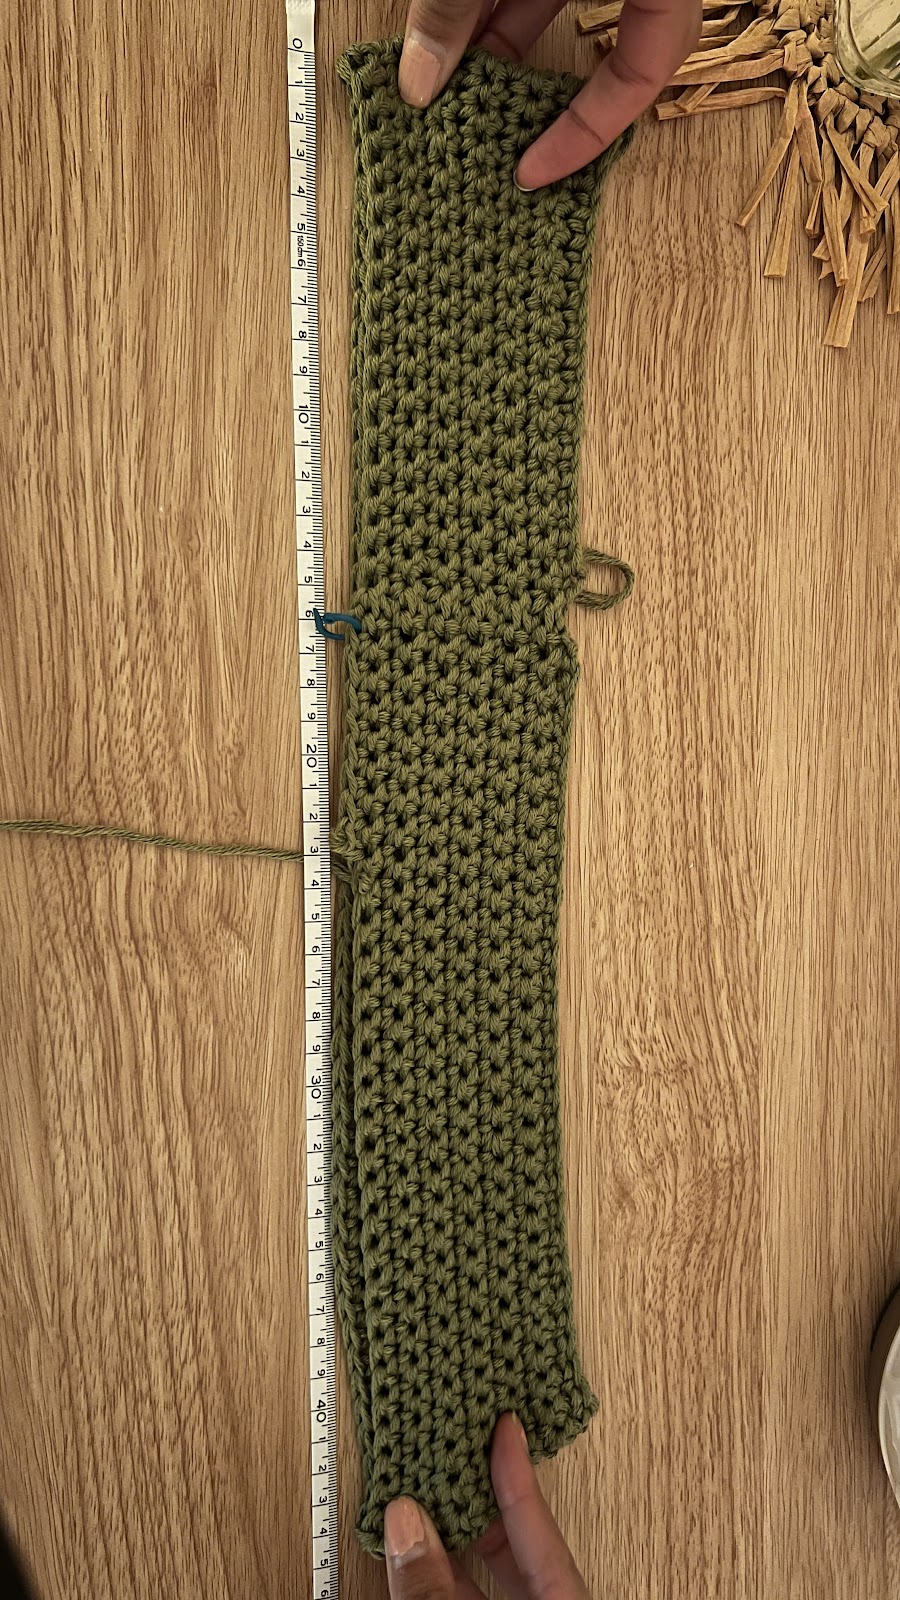
Increase stitches slowly, while measuring the following points as you go:- Try on the top and check sizing
- With your measuring tape, check the width of your current row, to see how wide you need to get to measurement #2. Stretch your fabric a bit, as it would on your body.
- With your measuring tape, check the height of your piece, to see what length is left over to get to measurement #3.
- These are good indicators to keep in mind, and will help you assess how many more rows/increases to do.
Below I can see that I’m almost at the width I need, measurement #2, for the fullest part of my bust, which is 45cm across.
I’m almost at the height of measurement #3, which gives me an indication I probably need a couple more rows, and 1 increase per row.
- Add around one or two increases per row. Thinner yarn may require more increases, while thicker yarn needs fewer.
- You may need to unravel rows to adjust the increases. It can take practice until you get used to how many increases are needed per row for the amount of stretch you require.
Note: I recommend spreading increases somewhat evenly, but perfection isn’t necessary. Check the row underneath to gauge where to place your increases (so that you’re not adding an increase in the same spot as the row before – if you do this it creates a frill/warped shape)
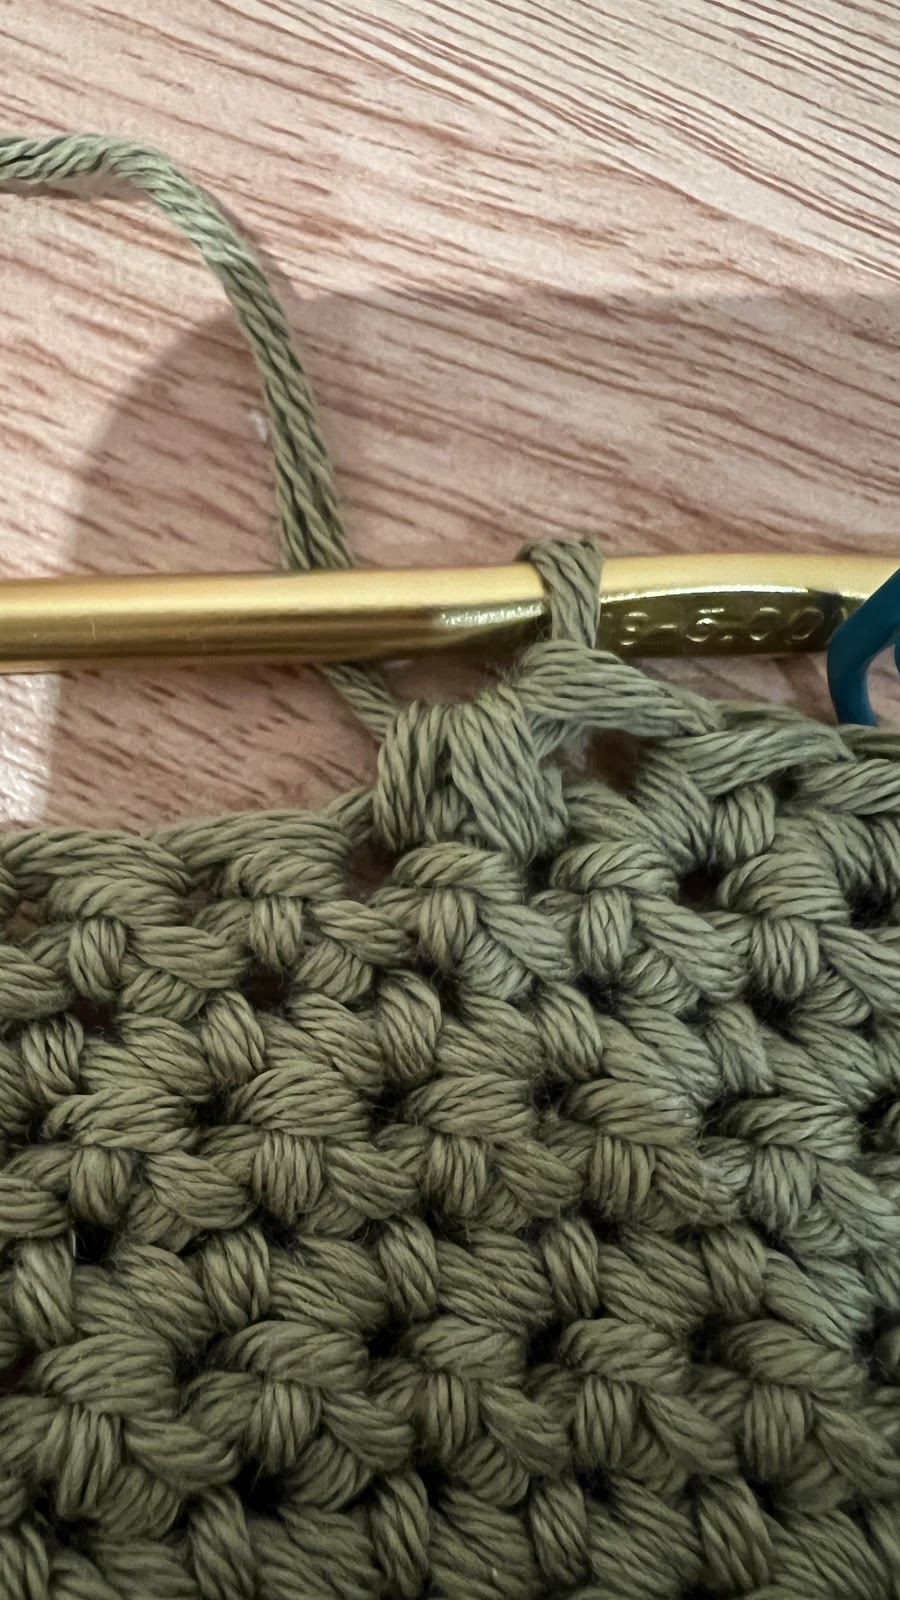
How to Single Crochet Increase:
- Insert hook into stitch. sc
- Insert hook into same stitch and sc
6. Stop increasing

- Once you get to measurement #2 and #3, you can stop increasing. Now you can relax and do as many rows, following step 3, until you want the top to reduce in width. It depends if you want a tight or loose fit, after the fullest part of the bust. I tend to gradually decrease, similar to how we gradually increased.
7. Decrease
- When it’s time to decrease, start gradually, decreasing one stitch per row.
- Gradually increase the number of decreases per row while maintaining an even spread
- Try on the top and check sizing
- With your measuring tape, check the width of your current row, to see how wide you need to get to measurement #4. Stretch your fabric a bit, as it would on your body.
- With your measuring tape, check the height of your piece, to see what length is left over to get to 4cm from measurement #5. (4cm approx, as we will be doing edging – so that you finish with the right amount of stitches, check below which edging and the multiples that go with it).
- As we did with increasing, these are good indicators to keep in mind, and will help you assess how many more rows/decreases to do.
How to Invisible Single Crochet Decrease:
- Insert hook into front loop of stitch. Yarn over and pull up a loop. (2 loops on the hook.)
- Insert hook into the front loop of next stitch. Yarn over and pull up a loop. (3 loops on the hook.)
- Yarn over, pull through all 3 loops on the hook.
8. Finishing and Edging
- Once you’re about 4cm away from the length you prefer, review which edging you would like to add, and ensure your row stitch count matches the required multiples (see notes below) and finishes on the required side (right vs wrong side)
- Work in the round as usual until you’re about 4 cm away from your desired top length.
- Prepare for a lovely edging that’s approximately 4 cm long.
Edging Options:
- Feel free to add your unique touch with either of these variations you love, or any you discover online.
- Check which side the following edging pattern you choose falls on, and start on that side of your work. You may have to do an extra row to be on the matching side.
- Count how many stitches you have in your last row, and adapt the stitch count for your desired edging. Example; Option 1 requires a multiple of 5 + 2, so you might need to add a row with increases to get to this number.
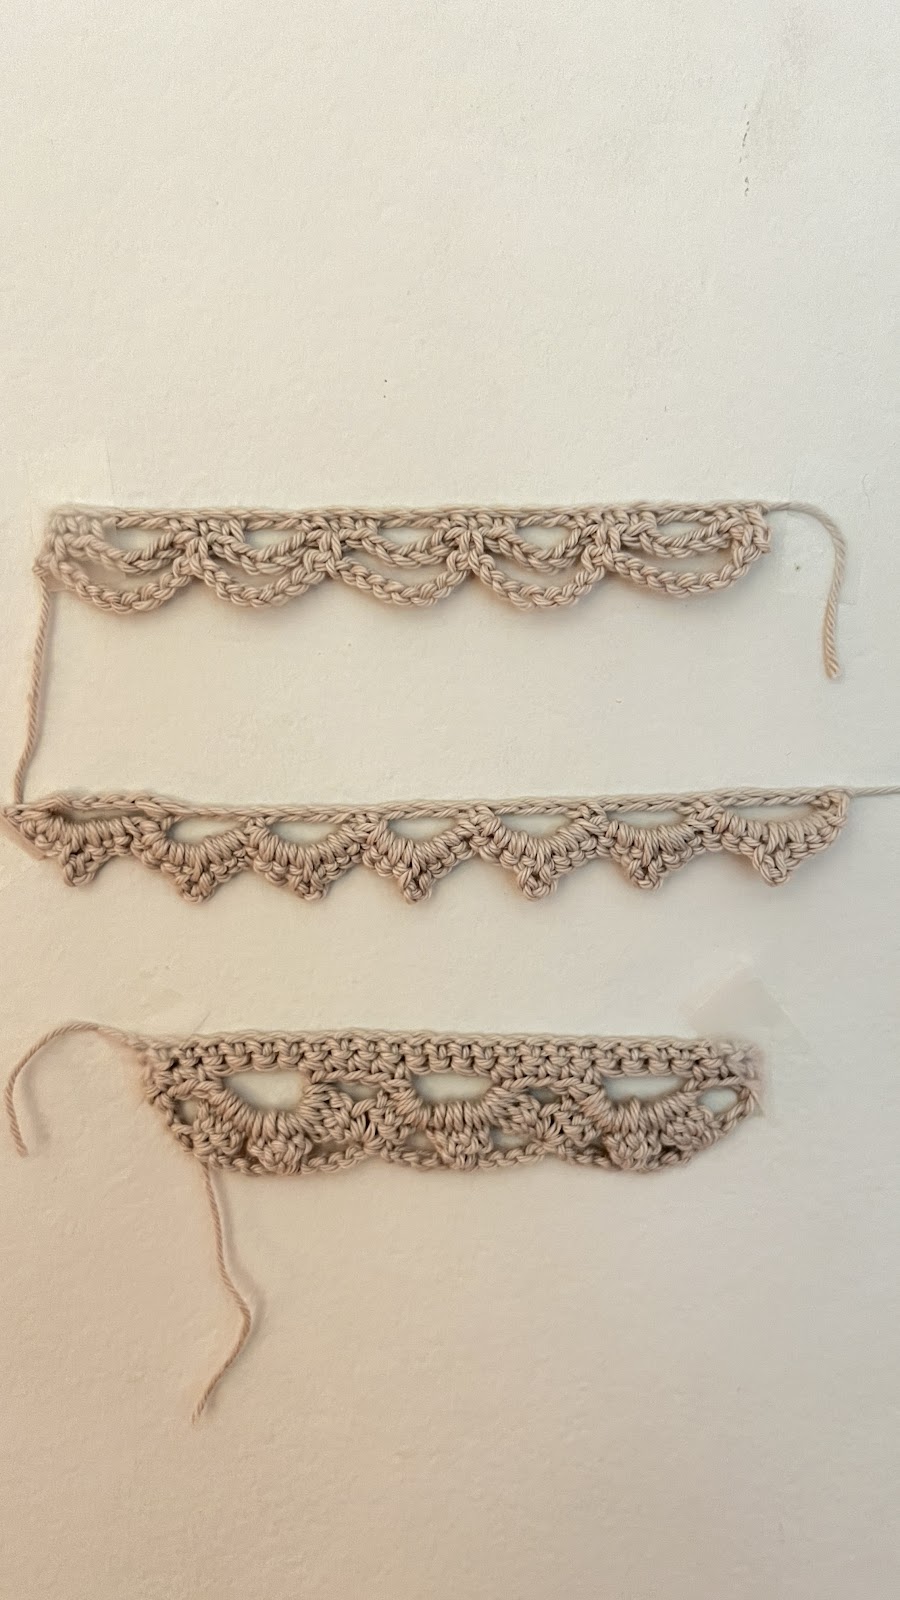
Option 1: Double Loop Edging (easy)
- To start edging, make a multiple of 5 ch, plus 2 extra.
- Starts on Wrong Side of your work
Row 1 (WS) 1 sc in 2nd ch from hook, 1 sc in next ch, *5 ch, miss next 2 ch, 1 sc in each of next 3 ch; rep from * to last 4 ch, 5 ch, miss next 2 ch. 1 sc in each of last 2 ch, turn.
Row 2 (RS) 1 ch, 1 sc in first sc, *8 ch. 1 sc in centre sc of next group of 3-dc; rep from * working last sc in last sc of row 1.
Fasten off.
Option 2: Picot Scallop Edging (easy)
- Make a multiple of 4 ch. plus 2 extra.
- Starts on Wrong Side of your work
Row 1 (WS) 1 sc in 2nd ch from hook, *5 ch, miss next 3 ch.
1 sc in next ch: rep from * to end. turn.
Row 2 (RS) 1 ch. *work [4 sc. 3 ch. 4 sc] all in next 5-ch loop: rep from * to end.
Fasten off
Option 3:Cluster Scallop Edging (challenging)
- Make a multiple of 8 ch, plus 2 extra.
- Starts on Right Side of your work
Row 1 (RS) 1 sc in 2nd ch from hook, 1 sc in each of remaining ch. turn.
Row 2 1 ch, 1 sc in first sc, 1 sc in each of next 2 sc, *6 ch, miss next 3 sc. 1 sc in each of next 5 sc; rep from * to last 6 sc, 6 ch, miss next 3 sc. 1 sc in each of last 3 sc, turn.
Row 3 3 ch, work [yo, insert hook in ch sp. yo and draw a loop through, yo and draw through first 2 loops on hook]
3 times in next 6-ch sp. 4 loops now on hook. yo and draw through all 4 loops on hook to close 3-dc group (called 3-dc cluster), *4 ch, 3-dc cluster in same ch sp. 4 ch. 3-dc cluster in same ch sp BUT do not close cluster (leave last 4 loops on hook).
3-dc cluster in next 6-ch sp and close this cluster and last cluster at the same time by drawing a loop through all 7 loops on hook;
rep from * to last 6-ch sp. [4 ch. 3-dc cluster in same ch sp] twice, 1 sc in last sc of row 2.
Fasten off.
Straps:
- Count the stitches in the top row of your Halter Hues.
- Find the middle stitch (it doesn’t need to be exact) to create four straps.
- Grab your yarn, make a slip knot, and get ready for the next phase!
1. Strap Creation:
- Insert your hook into the middle stitch and pull through your slip knot.
- Chain one and continue the chain to your desired strap length. Fasten off.
- Repeat this step three more times to create all four straps. (Two go on each side of your neck and tie at the back!)
Finishing Touches:
- Weave in and secure the initial chain.
- Tackle those loose ends, weaving them in neatly.
- Give your crochet top a refined finish by blocking it.
And there you have it! You’ve crafted your very own Perfect-Fit Crochet Top. Remember, this is your canvas; experiment with colours and add your personal flair. Enjoy the creative process and happy crocheting! 😊✂️🧶
What Our Testers Are Saying 🌟
Our amazing testers, who range from seasoned beginners to advanced crocheters, have provided invaluable feedback. From yarn choices to unique modifications, their insights are super helpful. Check out what they had to say about this free crochet halter top pattern!
Dev @devoandstitches


- Measurements: Bust 32″, Waist 24″
- Feedback: “I liked how it wasn’t just in one continuous loop, but the back and forth after each row made it more exciting than monotonous. I also liked how customizable it is. Each person can add their own unique flare depending on their style preferences. I also really like how easy it is to adjust it perfectly to your own size.”
- Modifications: Added my own edging. I used a basic shell stitch. I may have added slightly to the length as well, I just kind of went until I felt comfortable!
- Yarn: Coboo (cotton & bamboo blend)
- Weight: 4
- Number of Skeins: 1
Jordan @jochetcrochet_luv


- Measurements: Bust 34″, Waist 26″
- Feedback: “I loved how you invoked creativity in the way that wrote and designed the Halter Hues. It was a very light and fast crocheting experience”
- Modifications: Added Romanian Cord Straps, the edging I found on YouTube, not sure of the name. I also only increased and decreased within my bust area. That way I created a tailored fit.
- Yarn: I used a dk wool and cotton blend, it’s warm but breathable. I think It worked nicely for the extra warmth I wanted but for mid summer I would choose all cotton yarn.
- Number of Skeins: 1.5
Astrid @ma.crochet.id


- Measurements: Bust 30″, Waist 27″
- Feedback: “This design is a blank canvas, a lot of room for more personal creativity, like adding something on the top, choose the stitches for the strings, and lacing options. The pattern layout is good, very clear and easy navigating. I enjoy working on this pattern. Very quick project and beautiful outcome. I love all the options for the lacing, but I only can have one 😁 I love your work, and so happy to be able to test for you. I hope I can test for you again in the future ❤️”
- Pattern modifications: I made iCord for the halter string, tied it in the middle center top. I chose opt 3 for the lacing option. I didn’t increase at the beginning, but decrease 14 sts after under bust.
- Yarn: Cashmilon yarn
- Weight: 2, Sports Size
- Number of Skeins: Less than 1 ball, per ball appx 180 m, 100 gr
Zuly @crochet_by_zuly


- Measurements: Bust 48″, Waist 45″
- Feedback: “What I liked about the design was that the straps and edging were all up to me. I love that option!”
- Modifications: I didn’t increase at the bust I only used the decrease because my yarn stretchiness
- Yarn: Super Saver Sport
- Weight: 180 grams
- Number of Skeins: 2
Summing It Up
So, are you ready to turn heads this summer? Grab your crochet hooks, choose your favourite yarn, and let’s get stitching! Fill the form below to download your free crochet halter top pattern and let the crochet adventure begin. Happy stitching, everyone!


Pingback: DIY Crochet Bralette: Crafting the Perfect Fit for Everyone -